
Image by Агзам Гайсин from Pixabay
Re: Endgame Bootcamp
An Addendum
Endgame Bootcamp 1: Camp Addendum
Endgame Bootcamp 2: Part 1Part 2Part 3 Part 4
Endgame Bootcamp: 3 4 5 67
Sharing my First Blog Post I got some feedback, and wanted to follow up on it.
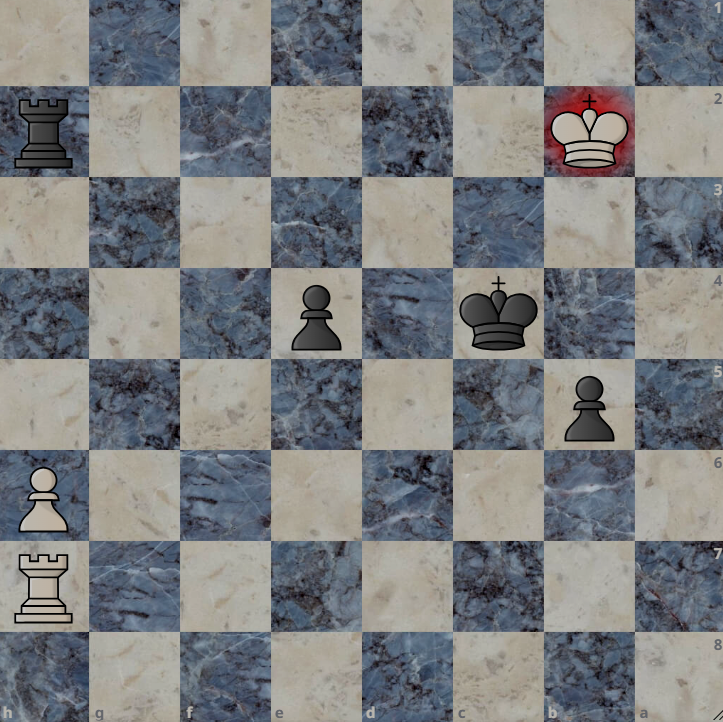
What is black's plan? (queen one of the pawns, find a good square for the black king to avoid rook checks, and why does black need to achieve both)
Avoiding Rook checks by White in this endgame allows Black to position the King in the middle of the two pawns they’d like to queen. It’s a cherry on top that Black accomplishes this task without barriers.
There are only three moves Black has to maintain the win in the position after Kc1. In contrast there are 9 moves Black has to maintain the win in the position after Kb1.
If the Black King steps to a square initially that would allow checks, Draw or Loss is the result. Quickest example is Kc1 Kd4 Rd7+ Kc3 Rc7+ Kb3 h7. Black is no longer winning.
Note the white Rook activates with check and then continues to protect the h pawn. Black’s King cannot do much on the other side of the board, and White is able to march up, even if Black consistently checks from a distance.
Feel free to use the table base to explore all the variations. You’ll find Black’s and White’s path to “victory” “draw” and “loss” can be sharp.
We have addressed the importance of avoiding checks, but why is queening a pawn important?
White still has a rook, and if we fight with just Rook vs Rook, it’s drawn. The White Rook must be traded with a pawn that promotes, or with Black’s Rook prior to promotion. Best situation is a Queen and Rook for Black, but positions with just a Rook for Black and nothing for White may arise.
The main victory factor is Black’s free move with no threats to address, which we could call tempi, to use once White steps to c or b1.
Black will escape Rook checks to avoid the Draw/Loss and start pushing the pawns.
White will have to spend a move to get their rook activated, but the cost is too much because the h pawn is no longer defended.
White could start to move the King closer to the e pawn instead of activating the Rook, but Black safely pushes a pawn or steps closer to defend where the White King and Rook might try to probe.
Whether or not Black has to take the h pawn in certain variations to maintain the win, should attest to the strength of Black.
For now an exercise in visualization: Imagine you have no threat of an opponent’s pawn Queening (h pawn for White is gone) and you can push a pawn with a Rook defending it from behind (easy for Black to position their Rook after taking the h pawn). Which leads us to the concluding ideas:
What is black's quickest way to achieve the plan? (you say black can sac a pawn, but how and why? you could show a line where that happens)
Black’s quickest plan is to march the King up and get the pawns rolling. (Kc1 Kb3 or Kb1 e3) Black will take the h pawn if White stops protecting it, and White will not be able to get to the Pawns and avoid mate.
Recall the visualization: we want a position where our Rook can still assist with pawn promotion, and not restricted to stopping White’s pawn
Note a draw occurs during Kc1 Kb3 Kd1 e3 Rb7 Rxh6 Rxb5+, black must play b4 instead. There are so many ways for White to try and stop Black from winning.
Here’s one quick line where a pawn is “sacrificed”.
Kc1 Kb3 Kd1 Rb7?! Rxh7 Rxb5 Kc4 and Black is solid enough to get the e pawn to promotion, because wherever the Rook goes, either Black King or Rook will come to the aid of their pawn.
You may also like
 Mradsomer
Endgame Bootcamp 2: Part 3
A Perfect Storm Mradsomer
Endgame Bootcamp 8: Exploring a Draw
Draw Draw Draw? Mradsomer
Endgame Bootcamp 3
A Simple Ending Duo Mradsomer
Endgame Bootcamp 2: Part 4
All about that d5: Swimming in Rc1 Waters Mradsomer
Endgame Bootcamp 2: Part 1
White to move and WIN! Mradsomer