
Daniel Wexler, More Space Battles
Better Fast Path
Allowing more people to play 3D chess by optimizing the fast rendering path and adding soft reflections and tweaking it to look more like the path tracer.UPDATE January, 2026: The app is now available at chessboard3d.app
This is my fourth post about my interactive 3D chessboard web app that integrates with Lichess. In this post, I describe how I made it look better, and run 1.5x - 3x faster than before. The earlier posts covered:
- The rendering pipeline (path tracing + SSGI + SVGF)
- The UX and movement gestures to make it feel OTB
- Sharing a board with another human over the web
This new release is about making it work well on more devices, especially less powerful GPUs. For me, this goal implied making the rasterization path look “close enough” to the path tracer, while still running smoothly on less powerful devices. The big missing feature was reflections.
BTW, I really need a lighting artist to adjust the default material and lighting setup. Let me know your favorite material settings in the Discord (they are stored in the browser’s “local storage”). As a VFX veteran, I know how much better things look when a real artists takes over from a programmer, like me.
I also removed a bit of what I’d call smartness == badness, where the app was trying to automatically adjust the rendering type and quality based on the current performance. Now you can just select between the faster rasterization pipeline, or the full MIS path tracing pipeline, with a quality level. Remove the smartness and let folks just choose what they want.
You can play the latest beta version here
Please join the Chessboard Discord to report bugs and suggestions
WARNING! This free app is work-in-progress. Please expect occasional instability and bugs.
Why Reflections?
The raster pipeline now has soft reflections that are intentionally designed to “feel” like the path tracer, and the app now gives you the controls to pick what you want: beauty, speed, or somewhere in between.
If you try to make a chessboard look like a real board on a café table, reflections do most of the heavy visual lifting in order to show the sheen on the board and pieces.
The path tracer already did this naturally (at a high cost). The raster path didn’t, and it made the “fast path” feel like a different game visually.
An aside with more detail than you probably want: I keep talking about the faster "rasterization" pipeline and the higher quality "ray tracing" pipeline. Why is rasterization faster? You can find more details in my previous blog post. In the example video rasterization might even look better to you, probably because it has a bit less noise. GPUs have traditionally been optimized for rasterization, which renders the scene from the camera's perspective storing a depth for each pixel in what's called a Z-Buffer, to figure out which surface is closest to the camera (visibility). Rasterization is super fast, but it doesn't handle all paths that light takes in the real world, bouncing off of surfaces and different materials in weird ways. Ray tracing models these rays, especially "path tracing" which sends rays all around the scene by bouncing them off of their materials using a physical model of the material to control the bounced ray direction. It is a much more physically accurate model of how light works and tends to have very subtle but visually important improvements that are difficult to simulate in rasterization, and take a great deal longer to compute. Recent GPUs have new hardware specifically to accelerate ray tracing. Unfortunately, we can't access that new hardware in programs that run inside of web browsers, sigh. Instead, we use the GPU kinda like the AI guys use the GPU, to process lots of rays in parallel using rasterization to create a screen-space model of the scene in a layered depth image, or GBuffer.
Planar Reflections Are Tricky
I’ve written rendering code for a long time, but somehow I’d never implemented planar reflections end-to-end. They look “obvious” in hindsight, but the geometry is one of those things you either already know... or you spend a few nights re-deriving it.
The Idea
A planar reflection is a second camera rendering the world as if the scene were mirrored across a plane (the board surface). You render that mirrored view into a texture, then sample it when shading the real board/pieces.
Think in 2D first: a camera above a plane, looking down at a 45º angle. The reflection camera is the mirror image of the real camera across the plane: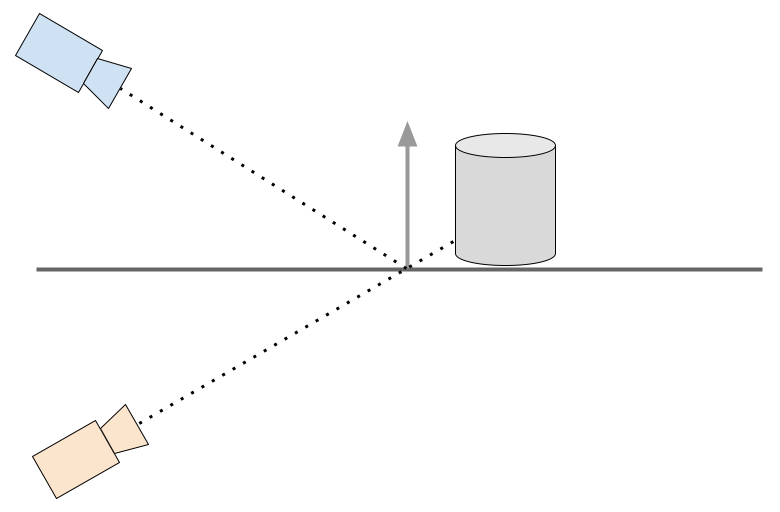
Note that the reflection camera isn’t “somewhere in front of the mirror.” It’s literally the mirrored camera and the reflected ray isn’t guessed, it’s the geometric reflection of the real ray across the plane.
The image below contains inset squares showing the reflection color and depth maps. There are two reflection textures, one for the chess board and another for the marble table because they are at different locations, even though they share the same normal. Note that you can see the board frame in the reflection map for the table, and you should also see the board, but I have omitted it from the rendering since I know that it never contributes to the reflections.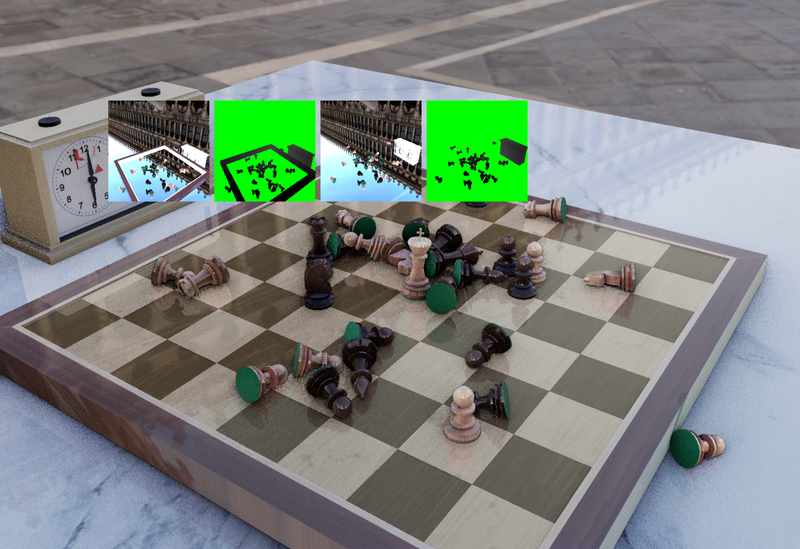
Blurring Reflections
Perfect planar reflections can look too sharp (and too fake) unless you’re intentionally simulating a polished mirror. Real boards and varnished pieces have micro-roughness; the reflection should get blurrier as the reflected surface gets “farther” in a useful sense.
The trick I’m using is to estimate a blur amount based on the distance between the shaded point on the real surface, and the corresponding point you hit in the reflection texture (the reflected scene depth). We already had code to convert a view space depth into a world space point, so we can do that for both the shaded surface, using the GBuffer, and the reflected surface, using the view space Z depth stored from the reflection camera. Then we can simply find the distance between the two world-space points.
Then, using that distance, we can compute a blur factor, a MIP-map level in our texture, to use for the shaded color from the reflection color texture pyramid. It’s not physically perfect (the path tracer still wins), but it produces a blur that feels grounded in the scene instead of being a constant smudge.
To blur the reflection, or essentially the same sort of blurring done to find a MIP-level but using occlusion tests on a depth texture, I’m using a PCF-style filter (percentage-closer filtering), but instead of using it for shadow comparisons, I’m using it as a convenient multi-tap stochastic blur. It works by first transforming the shading point into the reflection texture, and then sampling the reflection depth and color in a disc around the transformed reflection. The wider the disc, the blurrier the result.
The fun part: I reused the same RQMC random noise pattern already used by the MIS path tracer. Using the high-quality blue noise Heitz and Sobel random noise from the path tracer really improves the quality of the blurry reflections.
Removing Rendering Passes
A lot of this release was not “new pixels,” but deleting expensive pixels. I was a bit worried about adding two rasterization passes for the planar reflections, but it turned out that we were accidentally doing three extra rendering passes in the main camera for depth peeling, which isn’t used in the fast path, and only needed by the MIS path tracer to trace rays in screen space.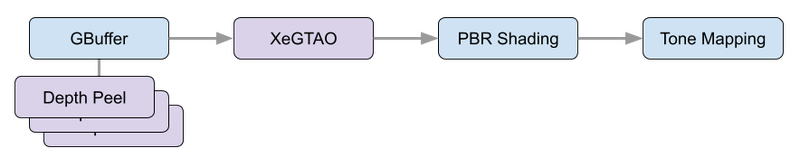
Removing unused depth peeling passes
In the path tracing post, I talked about multi-layer depth peeling for the GBuffer. That’s essential for the screen-space intersector. Each pass "peels" away a depth layer in front using the last pass, giving you sequential depth maps from the camera perspective. The combination of depth peeled images is sometimes called a "layered depth image" and serves as the occlusion geometry during ray tracing.
But for this raster reflections work, I discovered I was effectively paying for depth peeling passes that weren’t contributing to the raster path. This release eliminates three of those peeling passes during rasterization.
That’s a huge win because depth peeling isn’t just “one more draw”, it’s repeated geometry submission, bandwidth, and a chain of dependent passes.
Removing XeGTAO from the fastest pass
The fast path used XeGTAO (Ground Truth Ambient Occlusion) as a cheap way to get plausible shading on weaker devices. Ambient occlusion is an estimation of the percentage of the hemisphere above the shading point that can "see the sky" and is not occluded by nearby geometry. The result is an image where we "darken the cracks" in the scene, giving a lovely soft and natural look to the diffuse shading.
However, once planar reflections were working, I revisited the lowest-quality mode and realized: on truly low-end devices, the AO pass was too expensive compared to what it was contributing to the final look. At low settings, the AO approximation is very noisy, so much so that it is more distracting than helpful. So the fastest raster path now skips XeGTAO entirely. The result is a better frame rate on the bottom end that looks cleaner, even though it is less physically accurate.
Looking at the performance numbers, it appears that removing these passes accounts for 0.8 - 1.2 ms per frame, which is 30-45% of the total frame time, at every quality level on the fastest of benchmark platforms, the 4090 GTX.
Adding Scenes and Materials
To make the reflection pass share as much logic as possible with the main view, I introduced a Scene and Material abstraction.
The practical outcome is an indexed material system shared across the PBR shaders used in the faster rasterization pass and the MIS path tracer, which uses the material properties to guide the sample hemisphere selections for each ray. It also made it cleaner to add the new planar reflection camera passes, which are similar to the main camera GBuffer passes, but only need to output a color and depth.
That, in turn, made it easy to add new per-material information, specifically a planar reflection index, so that materials can opt into reflections differently and we have room to extend this later without inventing yet another ad-hoc uniform layout.
This is the kind of change that doesn’t scream “feature” in release notes, but it’s the sort of plumbing you need if you want the codebase to survive more rendering experiments.
Matching Up the Look
After implementing blurry planar reflections, my next task was to try and get the rasterization and ray tracing pipelines to produce similar images. It’s actually wonderful to have two separate rendering pipelines to use to compare the final output in order to find bugs. Unfortunately, even though the path tracer is likely to be more physically accurate, the simplifications we make in the rasterization path make it really hard to match the “look” of the path traced image.
Instead, we allow ourselves to manually tweak the rasterization path components to try and align the various simplified shading components it uses to mimic the behavior of millions of light rays bouncing around the scene. So we added a way to output the diffuse, specular, and clear coat components of the final color, and then I manually toggled back and forth between viewing these individual components of shading in the rasterizer and path tracer, and then tweaking the rasterizer to make them match. Mostly that meant multiplying by a constant, or perhaps changing the curve of a variable, like the material roughness.
As I continued to compare the components, it became clear to me that the path tracer was incorrectly approximating the clear coat contribution. It was much too low! It was barely visible, but, in comparison to the rasterizer, which looked and behaved correctly as the camera moved from a steep to a grazing angle, it was obvious that something was wrong in the ray tracer. It turned out that we were incorrectly using the wrong roughness, and adjusting it brought the two pipelines into much better alignment. A nice bonus I didn’t expect as part of this round of improvements to the fast path.
Please join the Chessboard Discord
And try the live beta
You may also like
 Kevin_M06
Deep Analysis of Lichess Puzzles
Ahh... Lichess puzzles. Don't we love them? RuyLopez1000
AI Slop is Invading the Chess World
Claiming that AI can teach chess is the latest fad danjlwex
Path-tracing a 3D Chessboard
The algorithms behind the fancy rendering for my interactive 3D chessboard web page RuyLopez1000
Why Are People Good At Chess?
The Rise and Fall of Chunks IM NikolaN98