
Photo by Hassan Pasha on Unsplash
Endgame Bootcamp 2: Part 2
A dip into the waters of Rc1
Endgame Bootcamp 1: CampAddendum
Endgame Bootcamp 2: Part 1 Part 2 Part 3 Part 4
Endgame Bootcamp: 3 4 5 67
Refresher:
c1 and e1 are the files best suited for a Rook. White takes the open file on e1, but attacks the pawn on c6 if it goes to c1.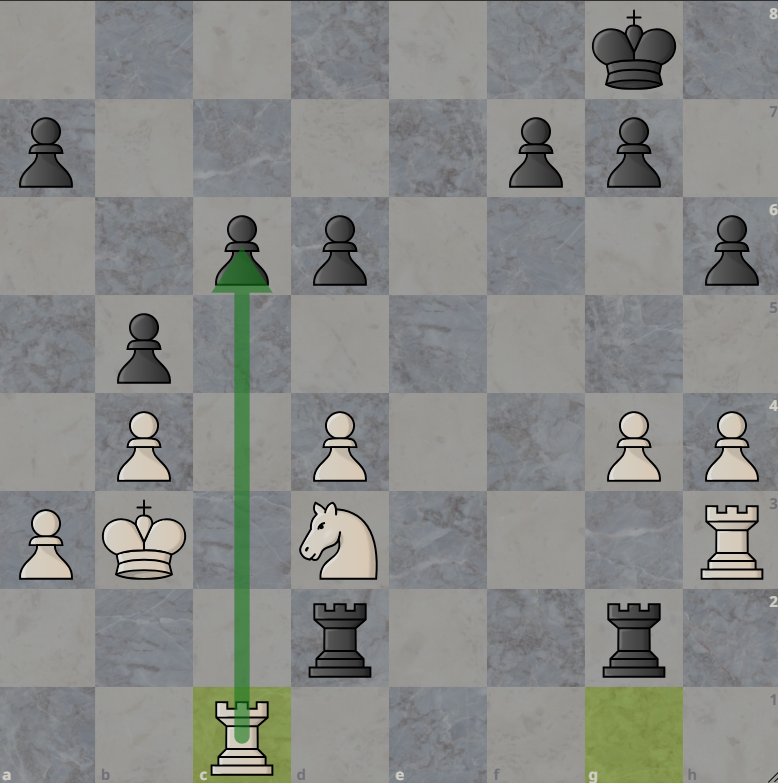
Scratching The Surface: Rc1
Of all the options for White's Rook a1, b1, c1, d1, e1, f1, and h1, what's best? What's the weather like? (Rxg2 is still advantageous for White, but the task becomes more difficult.) Not d1, as it's just as bad as keeping the Rook on g1.

Thematic Ideas
Black has to start defending their pawns after the White Rook penetrates/invades through the c file.
If this doesn't occur, Black's counterplay stems from poor play by White. Black can try to push the Kingside pawns, and threaten to promote.
This is an important concept/technique to remember in all games, taking the initiative and keeping your opponent on their “backfoot”, essentially forcing moves or ideas until they resign-become mated.
In order to highlight this I contrast Rc1 with a quick example, as I will further analyze non Rc1 moves in later parts.
Placing the Rook on candidate squares aside from c1 (excluding e1) could allow Black to defend in various ways. It would benefit Black to close up the c file with a move like Rc2, take the e file with Rde2. Or as the computer prefers, playing Rh2, stifling White ideas to push g and h pawns.
Allowing Black to reposition those rooks gives them the opportunity for Drawn or Winning chances. Sure allowing Black to make these moves does not lose the game for White, only hinders White, allowing barriers. White will usually have to be the first to push their Kingside pawns in these variations. Remember we are playing other Humans (most of the time) and not computer engines, so we must be prepared for any trickery.
White's accuracy is contingent on addressing Black's threats along the way. These threats are empty, and only slow the inevitable. Don’t be over aggressive with your Rook. If it strays too far, it will not be able to make it back in time for Black’s counterplay ideas on the Kingside.
To conclude these Thematic Ideas: White would rather be like water and follow the path of least resistance. How far away is the Black King from their pawn islands? Recognizing the attack with Rc1 as the weak point for Black is critical in the difference of advantage.
Visualization/Imagination:
Think of the board almost like the sea. White’s Rooks are about to mess up the small ships that Black has carelessly left unattended, and Black can take some of White’s small ships as well, but not enough to limit the damage that White will be able to deal. Sealing the victory. How to convert that walk to the finish line is the fun part.
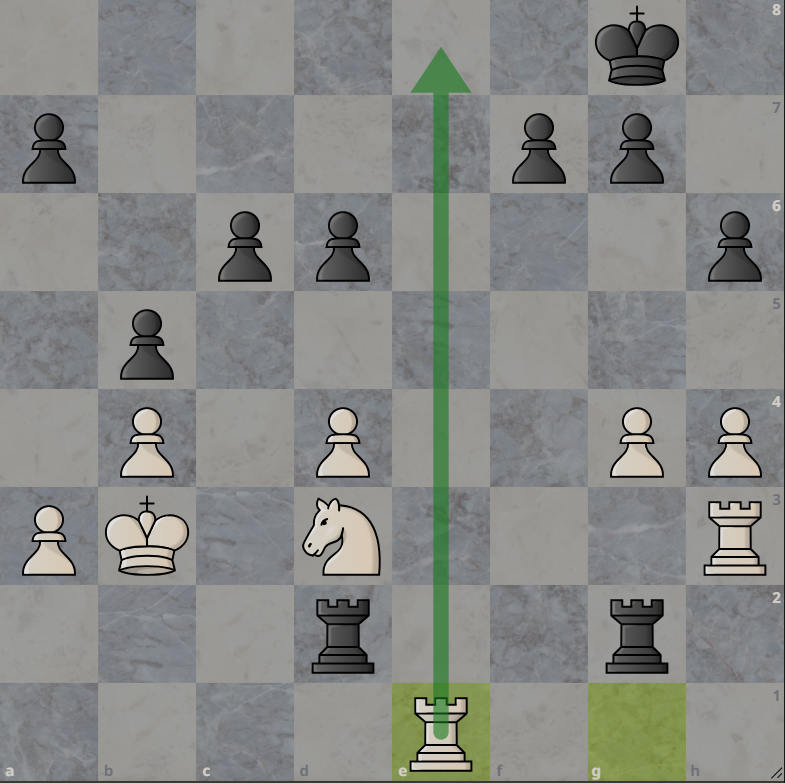
Rc1....Now what?
Now there is a strong mindset in chess, as I consult various brains: Take the open file. Who cares if Rc6 is "best" when you know for sure the Win is in your hands. I don't want to claim one is better than the other. We will be going over Re1 in another Part. It all depends on the weather.
What are the main Ideas White tries to accomplish with Rc1
We have identified weaknesses in Black's position, so it's time to exploit them. The Pawn Islands, and King Position. We have identified the strengths in White's Position. An Active Rook, Move Initiative, More Material, and King Position.
We are leaving the g pawn for the taking, because we will be taking most of Black's pawns in the process. Be patient with the Knight for now. We don't know what Black will do and where the Knight is best placed. For now it's mighty fine on d3. In other words: I am up Material, it's my turn, I can capture free material, and I'm not at risk of being checkmated. The Black pawns are almost begging to be taken, and the White pawns are willingly sacrificing themselves to ensure Victory! Sounds like a great plan to me.
Black's potential responses to Rc1:
Rh2 is Black's chance to fight back, offering White to trade a Rook. After trading, which isn't required, White proceeds to wreck Black's pawns, and doesn't mind losing some of their own in the process. The White Knight is going to do wonders in this endgame, don't think otherwise because Black has more pawns. Not for long!
Rxg4, a pawn for a pawn, but White still has the initiative and continues to scoop up more Pawns. Black's Rooks are no longer coordinated, and there is no slowing down White. White needs to maintain accuracy in order to not to let Black promote.
g5 initiates a different move order to obtain the same position as previous line with Rxg4.
The lines where d5 is played by Black are sharp and have many variations. If White decides to take on c6 after d5, Black's "best" continuation is Rd1. White doesn't have to play Rxc6 immediately, as shown in the next example
Remember how Black’s rooks looked at the start of the position? Just a few moves after Rc1 and White is controlling the flow of the game. Black is neutralized.
Human Analysis
After analysis at home, I took the position to a Friend and picked their brain. His defensive ideas consisted of threatening to promote the f or g pawns, getting the King to f8 quickly before White is able to force Kh7 with a check on the 8th rank. After I played Rc1 he chose Rde2, and some bumps in the road clarified the line we followed.
The biggest takeaway from my friend's analysis: Save as many White pawns before attacking the queenside. If White does not take the e file, Black should with Rde2, and push the Kingside pawns in hopes White doesn't properly defend.
You may also like
 Mradsomer
Endgame Bootcamp 8: Exploring a Draw
Draw Draw Draw? CM HGabor
How titled players lie to you
This post is a word of warning for the average club player. As the chess world is becoming increasin… Mradsomer
Endgame Bootcamp 7: Mating Nets
We can't stop here...this is Mating Net country! ChessMonitor_Stats
Where do Grandmasters play Chess? - Lichess vs. Chess.com
This is the first large-scale analysis of Grandmaster activity across Chess.com and Lichess from 200… FM MattyDPerrine
What “Talent” Actually Means in Chess (It’s Not What You Think)
Talent exists but it's not what's holding you back. NDpatzer