
Photo by Phillip Flores on Unsplash
Endgame Bootcamp 7: Mating Nets
We can't stop here...this is Mating Net country!
Endgame Bootcamp 1: CampAddendum
Endgame Bootcamp 2: Part 1Part 2Part 3 Part 4
Endgame Bootcamp: 3 4 5 6 7

We are in Tablebase Territory!
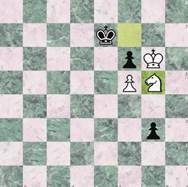
FEN: 8/6k1/5pNp/5PPK/7r/8/8/8 w - - 0 52
All the pieces in one corner of the board, it's time for White to strike while the Iron is hot, and the less skilled of a Blacksmith you are, it's easier to crack under pressure. It's Mating Nets all the way down, with a bonus, where checkmate is still a ways to go if Black fights tooth and nail through Zugzwang. White's Knight is the key.
The Only Move
Nxh4, hxg5 or fxg5. White's Knight has a destination square in mind, can you find it?
Hint: The goal is for Black to eventually step away from guard duty, since the White King is at their pawn island. You also want to stop the g pawn from promoting. Moving the Knight forces White to make King and pawn moves that worsen their position. The Knight could go 4 squares from it's position after taking on h4.
Answer:If fxg5 or hxg5 the Knight stops the e pawn from advancing, and protects their own f pawn. Ng2 is the only transition square to e3.
Example hxg5 continuation: Ng2 Kf7 Ne3 Ke7 Nd5
Instead, after Ne3, Black moves their King to g7. Trying to hold onto their pawn like an anxious child holds hand in public, but a death grip is no use (playing g4 at this point should obviously be out of the question). Ng4 restricts Black even further, now a pawn move is impossible.
Example fxg5 continuation: Ng2 Kf6 Ne3 Ke5 Kg6 Kf4
The Knight has succeeded in repositioning Black's King, and now eyes the weak pawns.....Nd5 Kf3 Nf6 g4 Nh5
The Black King cannot stop the f pawn from promoting, and White can prevent both of Black’s pawns from promoting. Even if g3 Ng3 Kg3 Kh6 and the f pawn walks up safely


But we don’t always have to see the same path.
After hxg5 Ng2 Kf7 White could continue with Kh6 g4 Kh7 Kf8
The delay of Ne3, letting White place the King on g6, with White’s following moves Ne3 Ng2 forcing Black to step away from the f pawn.

Playing Under Pressure
Mistakes are made across all levels of the game.
Ng6 Kf7 Nh8.
Providing Black with counterplay opportunities.
Ke7 Kg6 g4 and White has one move to keep winning.....so what happens if White doesn’t find the move?
Nf7 g3 Nh6


A Black Mating Net
Now Black gets to squeeze the life out of White’s position. There’s no stopping the pawn from Queening now.
It's still a ways away, but here's one continuation:
g2! Ng8 kd6 Kf6 g1=Q
Nh6 Kd7 Nf7 Qd4 Kg5 Ke7
Nh6 Qg7 Kf4 Qh6 Ke4 Qd2
Kf3 Qd3 Kg2 Qe2 Kh1 Kf6
Kg1 Kf5 Kh1 Kf4 Kg1 Kg3 Kh1 Qe1


Better was a drawn ending:
Both sides promote, with Ng5!
After fxg5 Kg7, pawns are pushed and as long as the Black King avoids being checked as White promotes, the draw is held: g2 f6 Ke8 f7 Kd7
f8=Q g1=Q

Drill for Mate in seven!
One slip (Ke7) and it's back to another Mating Net for White!

One example line: Ke6 Qf6 Kd5 Qg5 Kc4 Kf6 g1=Q Qg1 and the drill begins:

Back to the White King-walk Victory!
 Kh5!
Kh5!
An only move to avoid peace. Continuation example g3 Ng6 Kd6 Nf4 Ke5
The idea is to walk the King up, and easily promote the f pawn, but that's not a quick task
Ke7 Ng6 Kf7 Ke4 Kg7 Kd5 Kg8 Ke6


You may also like
 Mradsomer
Re: Endgame Bootcamp
An Addendum Mradsomer
Endgame Bootcamp 6: Letting Wins Slip
Keep a solid grip Don't let the Victory slip! Mradsomer
Endgame Bootcamp 2: Part 1
White to move and WIN! Mradsomer
Endgame Bootcamp 5
A Bishop Ending and a Knight Ending Mradsomer
Endgame Bootcamp 2: Part 3
A Perfect Storm Mradsomer